Written by Amy Barton

Toad abodes are whimsical and practical projects and make charming additions to any garden. Toads are beneficial critters because they consume insects and slugs considered pests to gardens. The U.S. Department of Agriculture estimates that a single adult toad can eat 10,000 insect pests over the course of an average summer. Their pest eating qualities make toad abodes great gifts for nature lovers and gardeners alike.
You can choose to buy a toad abode (you can find them at your local garden store) however, making your own toad abode might take even less time. DIY toad abodes are inexpensive, easy, rewarding, and can be fun project for you and your family.
Not just a garden decoration
At first glance you might think that a toad abode is just a cute garden decoration, but you will be pleasantly surprised to know that toads really do use these little cottages! It could take anywhere from a couple days to a few months for the toad to find and claim your provided home, but once they do they make great yard companions.
Please do not find an adult toad and put a toad in your yard because they have already decided where they want to live. Try instead to put your abode out during the growing season, and over the summer young toads will be looking for a place to call home.
Where to put your toad abode
Situate your toad home in a shady spot in the dampest part of your yard. Placing it under a bush, near a downspout or under an air conditioner drip would work great. Toads like garden soil amended with compost. Make sure whatever house you make does not have a bottom as they will want to burrow down a little and make the house their own.
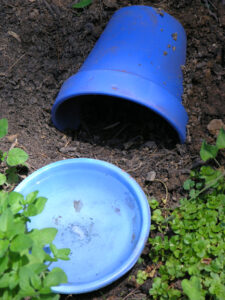
Toads need access to water, not deep water, but just enough to get a daily soak. Small garden ponds, bird baths or even a terracotta plant saucer will work. Give your water source a daily spritz with the hose to keep the water fresh. Make sure you keep your water source clean from algae by scrubbing with a wire brush if you start to see it appear.
How to make a toad abode with a clay pot
Using a clay pot is a great option because they stay cooler in the hot summer months, allowing your amphibious friends to escape the heat. Here are a few options for clay pot toad abodes:
1. The toad cave
Half bury the clay pot on its side leaving a nice little cave underneath. This option is super easy and might only take a minute or two.
2. The raised abode
Put the clay pot upside-down on top of a circle of rocks, removing some rocks to make an entryway.

3. The fixer-upper
You can also use a broken pot with a large chip in the lip. Toads are not picky, they just want a place to call home.

4. The cottage
If you’re feeling really fancy, you can hot glue river rocks to a clay pot for a more rustic look. Make sure to use non-toxic glue as not to harm your toad.

Decorating your Toad Abode
Making your toad abode a real home with some decorating is a fun way to match your personal style. Giving kids the opportunity to paint the home is a great activity and opportunity to teach them about amphibians, wild critters, and conservation. If you want to decorate your abode, make sure to use non-toxic, washable paint. Other paints could be harmful to your new friend.